

An online configurator transforms a catalog page into an interactive tool: the user specifies parameters, and the system displays the result. Choosing a kitchen color, changing the upholstery of a sofa, assembling a fence from sections, or customizing a house facade are all examples of tasks configurators solve in e-commerce and manufacturing.
Most often, this tool is used in:
- furniture and interior – kitchens, cabinets, sofas, doors
- construction and finishing – fences, gates, facades, roofing, floor coverings
- automotive industry – trim levels, body color, interior
- clothing and accessories – customization of sneakers, bags, uniforms
- bicycles and sports equipment – frame, components, color, accessories
This tool directly impacts conversion: users see the result before purchasing, are less likely to hesitate, and are less likely to contact a manager for clarification.


But for a configurator to work this way, it needs to be built on the right technology. There are three fundamentally different approaches:
- raster (PNG)
- vector (SVG)
- software rendering ( Canvas/WebGL )
Each has its own operating logic, advantages, and limitations. There's no universally best option: there's an option suited to a specific task, budget, and visual requirements.
Approach #1 – Raster (PNG/Images)
Think of the configurator as a collage. There's a basic scene: a cabinet frame, a car body, a fence section. Individual elements are layered on top of it – the color of the façade, the type of handle, the texture of the material. Each element is a separate image, pre-prepared by a designer or photographer. When the user selects a parameter, the system simply inserts the appropriate layer.
This is how most simple configurators work: no complex math, just a well-organized set of images.

What you need to prepare:
- The base image is the foundation of the scene onto which all other elements will be superimposed. For example, a cabinet frame without facades or a car body without color.
- Images for each variant of each parameter – if a product has three types of facades and ten colors, each combination must be drawn or photographed separately. The more parameters, the more files required.
- Consistent style and lighting – all images should be taken from the same angle, under the same lighting, and at the same scale. Otherwise, when changing parameters, the image will "fall apart": one layer will be lighter, another darker, and the edges will not match.
- Correct cutting of layers – each element must be cut with a transparent background and exactly match the base scene in size and position.
- File structure and assembly logic – the developer needs to be given not just a folder of images, but a clear diagram: which element is superimposed on which, in what order, which combinations are possible and which are not.
Pros:
- The most realistic image possible. Based on studio photos or high-quality computer renderings, the result looks as if the product already exists. This is critical for furniture, finishing materials, or clothing – the buyer must see the texture, reflections, and color.
- Clear logic for businesses. There's no need to explain how it works to your team: if you have images, you have a configurator. If the images are already prepared, you can launch this tool relatively quickly.
- Predictable results. Each visualization is manually controlled, ensuring the user's experience will always be exactly as the designer intended.

Cons:
- Poor scaling. Images have a fixed resolution. When enlarged or viewed on a high-pixel-density screen, they lose quality and become blurry.
- Large volumes of data. Each parameter combination requires a separate file. If there are 10 colors and 8 handle types, that's 80 images for just one element. With complex logic, the configurator churns out hundreds or thousands of files that need to be stored, loaded, and updated.
- Limited flexibility. Want to show a product from a different angle? Change the proportions? Add a new color option? Every change requires re-preparing the images. Nothing can be changed without redrawing.
When is it suitable:
- A small number of options means there are few combinations and the volume of images remains manageable.
- Photorealism is more important than flexibility – you need to convey the texture, structure, and materiality of the product, and the product range changes rarely.
- Ready-made images are already available – studio photos or visualizations of all options can be used directly in the configurator.
- Limited development budget – of the three approaches, PNG requires the least investment in software.
Approach #2 – Vector (SVG)
Vector graphics are structured differently than traditional photographs or renders. Instead of pixels, they use mathematical formulas: lines, curves, and shapes described by coordinates and parameters. This means the image can be infinitely scaled without loss of quality, and its parameters – color, line thickness, and shape – can be modified programmatically, without replacing files.
In the SVG configurator, each element is not an image, but an object that can be controlled via code. The user selects the color of a fence section, and the system recolors the desired element directly in the browser, instantly and without a browser refresh.

What you need to prepare:
- Vector files of all elements – each detail of the configurator should be drawn in a vector editor (for example, Illustrator or Figma) and properly structured: individual objects, clear layer names, without unnecessary elements.
- A well-thought-out structure of objects – it is important for the developer to understand which elements change independently, which are interconnected, and in what order they are superimposed.
- Color palettes and parameter options – all acceptable colors, sizes and shapes must be recorded and communicated as a clear list, not simply described in words.
- Constraint logic – which parameter combinations are possible and which are incompatible. For example, a certain section type is only available in specific sizes.
Pros:
- Perfect quality on any screen. Vector images look equally sharp on a smartphone and a large, high-resolution monitor. No blurring or artifacts when scaling.
- Lightweight and fast. SVG files are significantly smaller than PNG image sets. The configurator loads quickly even on slow internet connections – especially important for mobile users.
- Flexibility in changing parameters. Add a new color, change the size of an element, or change the shape of a part – all this can be done at the code level, without creating new images. Updating the product range is significantly cheaper.

Cons:
- Less realistic graphics. SVG conveys shape and color well, but struggles with materiality: wood grain, metallic highlights, and matte surfaces are all difficult to reproduce in vector at the level of a photograph.
- Limitations in complex scenes. If the configurator needs to display a detailed, 3D scene with numerous elements, SVG starts to suffer – both in terms of visuals and performance.
- Requires technical development. A well-functioning SVG configurator requires a well-thought-out object structure, well-designed state animations, and optimization for various devices. The more complex the configurator's logic, the higher the requirements for the quality of its implementation.
When is it suitable:
- The product is flat or semi-flat – fences, gates, facades, layouts: everything that does not require volume or rotation in space.
- The product range changes frequently – you can add a new color or element at the code level, without preparing new images.
- Loading speed is important – SVG files are significantly smaller in size than PNG sets, which is critical for mobile users.
- Flexible parametrics are needed – the sizes, colors, and shapes of elements change dynamically, without restrictions on combinations.
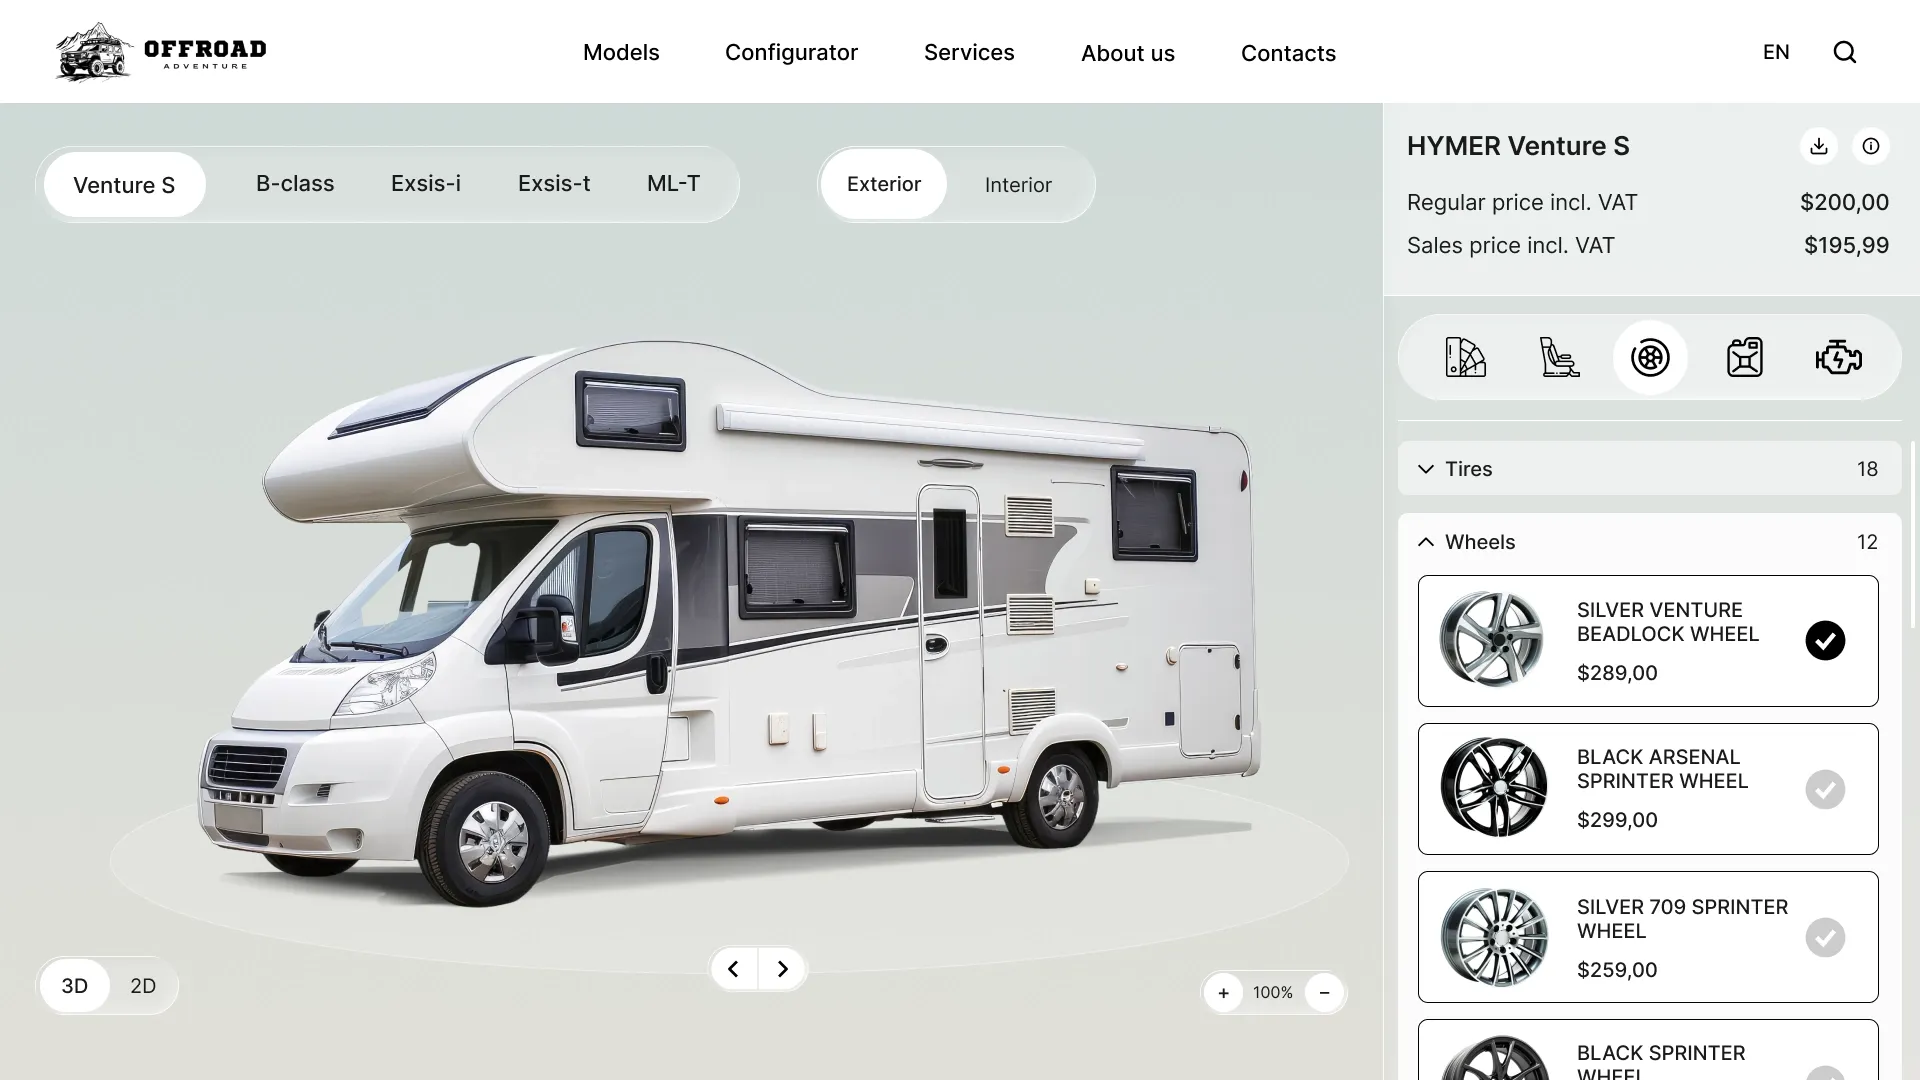
Approach #3 – Canvas / WebGL
This is a fundamentally different approach. While PNG and SVG work with ready-made or pre-defined elements, Canvas and WebGL build images from scratch – right in the browser, in real time. Roughly speaking, the browser becomes a graphics rendering engine: each frame is recalculated based on the selected parameters.
Canvas is an HTML element for rendering graphics, and WebGL is the API (engine) that runs on top of it and is responsible for rendering. However, Canvas itself isn't limited to 2D, and WebGL isn't "equal to 3D" – the outcome depends on how the rendering logic is implemented in the code.
WebGL is used in configurators from major automakers: users can rotate a car model, change the body color, and select wheels – all displayed in an interactive scene with realistic lighting, shadows, and depth.
What you need to prepare:
- 3D models of all elements – every detail of the product must be modeled in three-dimensional space. This is a separate profession and a separate stage of work, which often takes longer than the actual development of the configurator.
- Lighting and material settings – to make the wood look like wood, the reflection, transparency, and texture parameters are adjusted for each material.
- The logic of interactions – which elements can be combined, how they are connected in space, what happens when incompatible parameters are selected.
- Device optimization – 3D graphics put a strain on hardware, so it's important to plan simplified versions of the scene for low-end devices to ensure the configurator works for the maximum number of users.
Pros:
- Maximum flexibility. There are no limits on the number of options, angles, or parameters. Any change – color, shape, material, size – is calculated and displayed instantly. There's no need to prepare images for every combination.
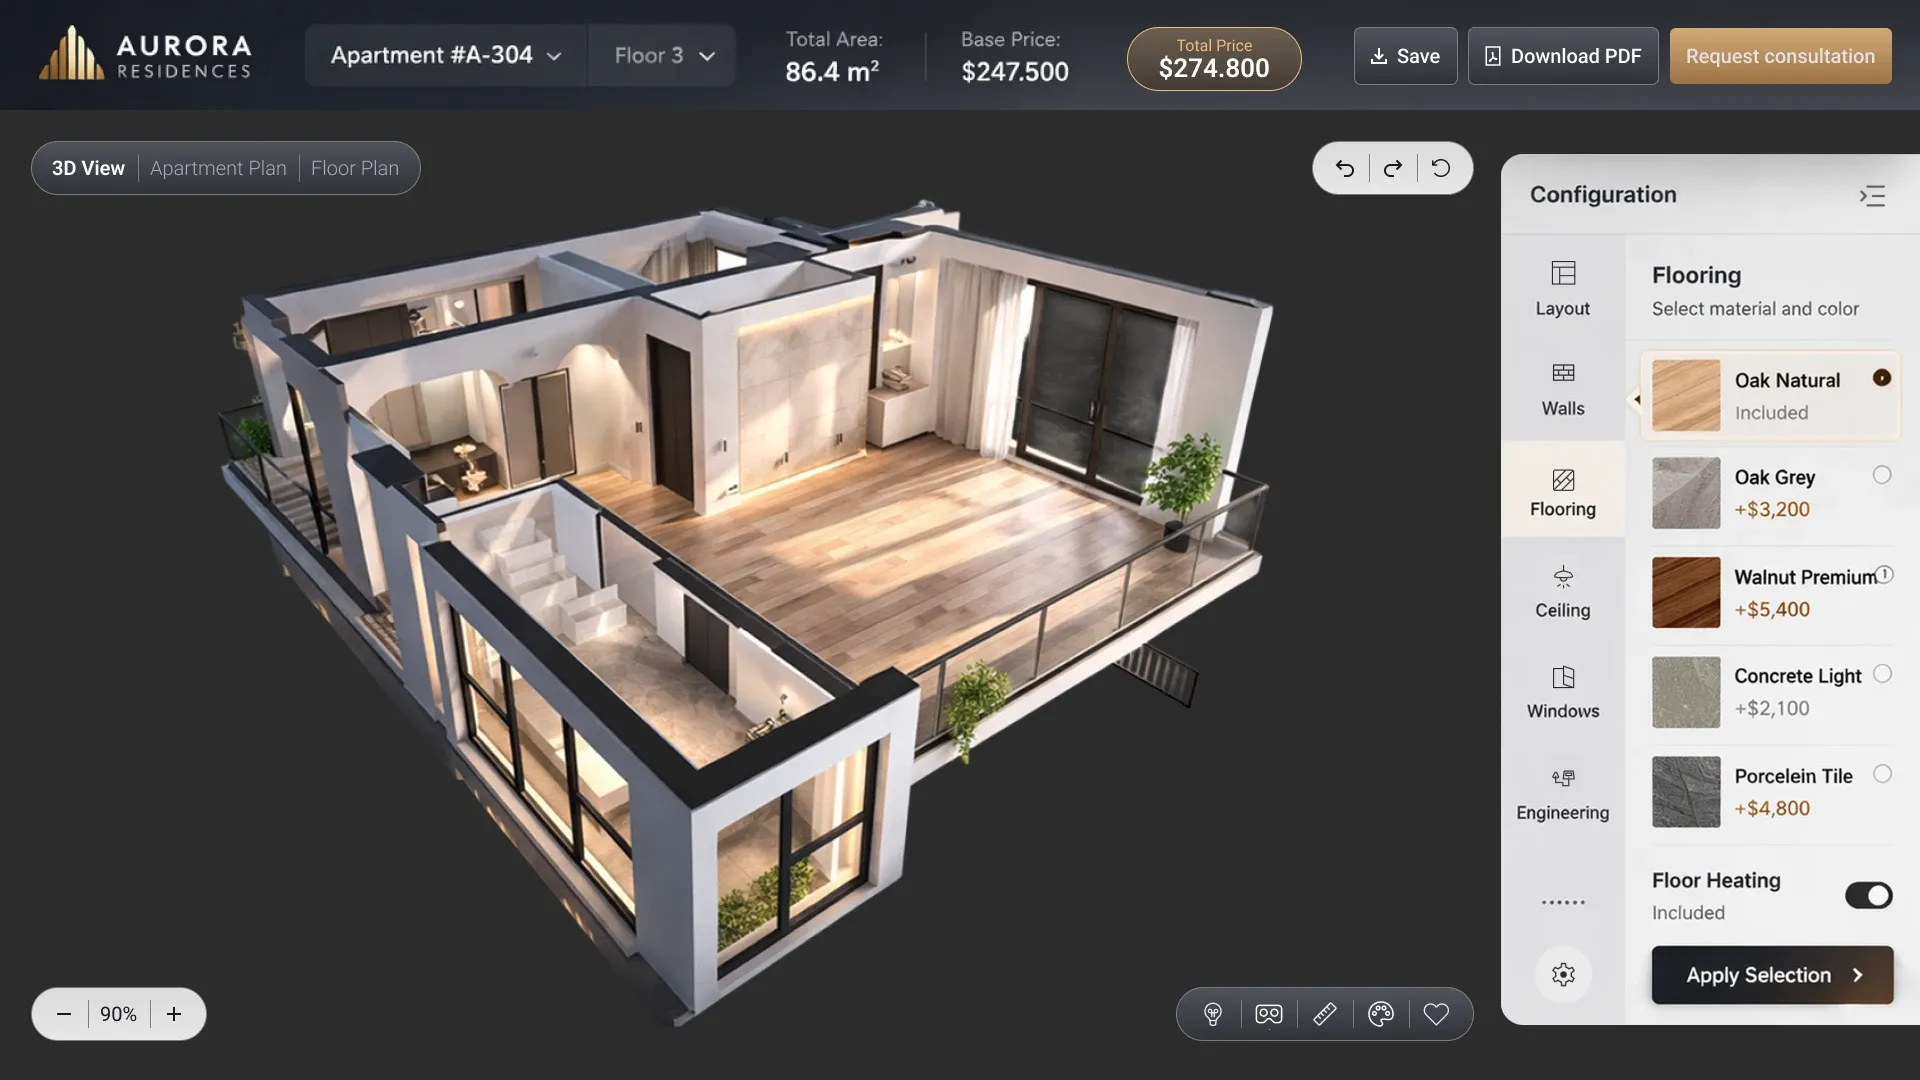
- Full 3D and rich interactivity. Users can rotate objects, zoom in on details, and see how their appearance changes under different lighting. This is a completely different user experience – especially for expensive or complex products where decision-making takes time.
- Animations, physics, and real-time lighting. You can show how a door opens, how a canopy casts a shadow, and what the façade looks like at different times of day. These are capabilities unattainable with the previous two approaches.
Cons:
- The most complex and expensive development. Creating a configurator in WebGL is a full-fledged engineering project. It requires specialized developers, 3D modelers, and technical artists. The timeframe and budget are significantly higher than for PNG or SVG.
- High demands on the user's device. Rendering 3D graphics in real time puts a strain on the processor and graphics card. On weaker smartphones or older computers, the configurator may run slowly or incorrectly.
- Long implementation times. Before writing any code, you need to prepare 3D models of all the elements, set up lighting, and define the interaction logic. This takes months, not weeks.
When is it suitable:
- The product is complex and expensive – cars, furniture systems, architectural objects: where the buyer takes a long time to make a decision and wants to consider the details.
- We need full 3D – the ability to rotate an object, change the angle, and see the product from any side.
- High visual requirements – realistic lighting, shadows, animations and interactivity, unattainable with PNG and SVG.
- If you have a budget and time, this is the most resource-intensive approach, requiring a specialized team and long implementation times.
Comparison table
| Criterion | PNG | SVG | Canvas/WebGL |
|---|---|---|---|
| Realism | high | average | high |
| Performance | average | high | depends on the implementation |
| Flexibility | low | average | high |
| Complexity of development | low | average | high |


Bottom Line: How to Choose an Approach
The choice of technology is determined not by which one is “better,” but by what the business actually needs.
PNG is a quick start with a photorealistic presentation and a limited number of options. Suitable if high-quality images already exist or are easy to create, and the configurator's logic doesn't allow for complex combinations.
SVG is the optimal choice for 2D configurators with flexible parameters. It's lightweight, scalable, works well on mobile devices, and is easily updated as the product range expands.
Canvas/WebGL – for tasks requiring full interactivity, 3D visualization, and maximum customization. It requires a larger budget and time, but provides the richest user experience.
Making the right choice at the outset will save you from reworking later. If you're unsure which approach is best for your task, it's worth discussing with the developer before starting the configurator design.
Submit a request, and we'll analyze your task and advise you on the best approach for your specific product.


